A Guide to Build Citation and Bibliography Pages in MS Word:
Answer
Easy Ways to Create References and Citations in MS Word:
Below are seven sections included in this guide. Scroll down to the section that applies to your situation.
- Section 1: Create a Bibliography or References
- Section 2: Empty Bibliography, References, and Works Cited
- Section 3: Citation and Bibliography Formats
- Section 4: Update a Bibliography, References, and Works Cited
- Section 5: Modify a Bibliography, References, and Works Cited
- Section 6: Delete a Bibliography, References, and Works Cited
- Section 7: Advanced: How to Import a List of Citations to Your Word Document using ChatGPT
=========================================================================================================
Section1: Create a Bibliography or References:
1. Place the cursor where you want to insert the bibliography:
- Press Ctrl+End to get to the end of the document.
- Press Ctrl+Enter to insert a page break.
2. On the References tab, in the Citations & Bibliography group, click the Bibliography button and then do one of the following:

- Choose one of the built-in styles in the drop-down menu.
- Select Insert Bibliography at the bottom of the list:

Note: If you choose the Insert Bibliography option, you will need to add a heading such as Bibliography, References, or Works Cited.
Word creates the Bibliography, References, or the Works Cited based on the sources. For example, the Bibliography in the IEEE style (see more about styles below):

Note: The automatically created bibliography, it does not matter how you created it, contains all sources of the document, even if some were removed or added by mistake. See how to manage sources for the Bibliography, References, and Works Cited for more details.
_________________________________________________________________________________________________________________________
Section 2: Empty Bibliography, References, and Works Cited:
After inserting a Bibliography, References, and Works Cited, Word can create a message “There are no sources in the current document.”:
![]()
The leading cause for this message is that Word could not find the citations created using the Citations & Bibliography functionality (see how to create a citation in a Word document). It is possible that there are placeholders in the document, but they are still empty.
To solve that problem, check the placeholders and citations. See how to manage sources for more details.
Don't forget to update bibliography in a document!
___________________________________________________________________________________________________________________________
Section 3: Citation and Bibliography Formats:
Depending on the selected style, the Bibliography, References, and Works Cited look quite different. For example, the Works Cited using the APA style:

To change the style, on the References tab, in the Citations & Bibliography group, open the Style drop-down list:

Choose the format you need:
- The American Psychological Association (APA) style is used for academic documents such as scholarly journal articles and books and in many social sciences.
- The Chicago style is used in history and economics and some social sciences.
- The Modern Language Association (MLA) style is most often used in the arts and the humanities, especially in English studies, modern languages and kinds of literature, comparative literature, literary criticism, media studies, cultural studies, and related disciplines.
- The American Sociological Association (ASA) style is used for writing university research papers in the field of sociology.
- The Institute of Electrical and Electronics Engineers (IEEE) style is used for writing research papers, commonly used in technical fields, particularly in computer science.
- Oxford, Harvard, and others.
The specified format for citations and a bibliography can be the requirement for some types of the document.
Note: You do not need to create a bibliography to see how it will look for selected style. After choosing the bibliography style, you can preview the format in the Bibliography list:

_________________________________________________________________________________________________________________________
Section 4: Update a Bibliography, References, and Works Cited:
Microsoft Word inserts a Bibliography, References, and Works Cited as a field:

or ![]() , if the Bibliography is inserted by clicking the Insert Bibliography command.
, if the Bibliography is inserted by clicking the Insert Bibliography command.
See how to turn on or turn off highlighting of fields in a Word document to display all fields in a document with a gray background.
Word will not automatically update any type of Bibliography after adding, deleting, or modifying sources or placeholders. You need manually update it, to do so, click on the Bibliography and do one of the following:
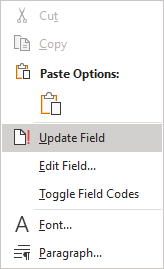
- Right-click anywhere in the sources list and select Update Field from the popup menu:

- Click anywhere in the Bibliography to show the field options. At the top of the field borders, click the Update Citations and Bibliography... button:

See also how to lock and unlock updating for fields.
_____________________________________________________________________________________________________________________________
Section 5: Modify a Bibliography, References, and Works Cited:
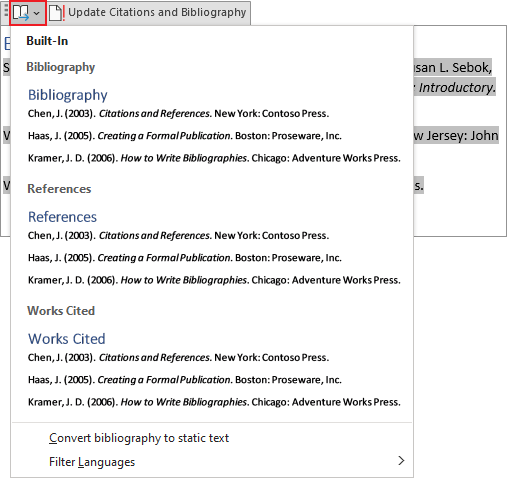
Word offers very simple way to change Bibliography to Works Cited or to References, and vice versa. To do so, click on the Bibliography to show the field options. At the top of the field borders, click the Bibliographies button:

Choose the bibliography type you need: Bibliography, References, or Works Cited.
Word also proposed the commands:
- Convert bibliography to static text.
You can use this command for the final version of the document to avoid any changes for sources, updates, or style changes.
- Filter Languages to show the sources of different languages (see how to create citations for more details).
Note: If the source has the default language, it can be shown for any selected language.
____________________________________________________________________________________________________________________________
Section 6: Delete a Bibliography, References, and Works Cited:
To delete a Bibliography, it isn't enough to delete only visible information, it is necessary to delete all the field. To do so, do the following:
1. Select the total Bibliography lines, including the last, empty line right after the Bibliography entries.
Note: If possible, click inside to show the field options. At the top of the field borders, click the Field button to select all the bibliography lines:

2. Click the Delete key.
Note: All the citations and placeholders (source information) are still saved in the current document, as well as in Word's Master list (see manage sources for more details).
_____________________________________________________________________________________________________________________________
Section 7: To add or import a source(s) from another document:
When you are working on a bulky document, a package of documents, you may need to add citations to sources created in another document. Word offers the ability to add a citation to a source already created in another document. All the sources you have created are stored in the XML file in your local PC. It can be stored in different locations, for example:
C:\Users\<user_name>\
Thus, you can import the source from another document to your local library. To do so, follow the next steps:
Step 1: Import the source to your Master List:
1. Open the document with the source(s) that you want to copy.
2. On the References tab, in the Citations & Bibliography group, click the Manage Sources button:

3. In the Source Manager dialog box:

- In the left list, you can see all the sources of your Master List that are stored in your local PC and that you can use,
- In the right list, you can see the sources of the opened document.
3.1. Select the source in the right list that you want to add to your sources list.
3.2. Click the <- Copy button:

3.3. Click the Close button to close the Source Manager dialog box.
4. Close the document from which to have imported the source.
Step 2: Import the source to be used:
5. Open the document or switch to the document, in which you want to use the source.
6. On the References tab, in the Citations & Bibliography group, click the Manage Sources button.
7. In the Source Manager dialog box:
- In the left list, you can see all the sources of your Master List that are stored in your local PC and that you can use. Now, you can see also the imported sources.
- In the right list, you can see the sources of the opened document.
7.1. Select the source of the Master List that you want to add to your document.
7.2. Click the Copy -> button:

7.3. Click the Close button to close the Source Manager dialog box.
You can add the citation using the imported source in the current document:

____________________________________________________________________________________________________________________________
(This Guide takes references from "Create a Bibliography, References, or Work Cited - Microsoft Word 365" )
---------------------------------------------------------------------------------------------------------------------------------------------------------------------
Please use this page to practice creating References/Bibliography in MS Word: https://libanswers.csudh.edu/faq/431996
---------------------------------------------------------------------------------------------------------------------------------------------------------------------------------------------------------------
